Getting Started
First check that the prerequisites are met.
Download the file PeasyMailServer-Linux.zip or PeasyMailServer-Win32.zip from the web site. Extract the ZIP contents into a folder. This will extract the files InstallPeasyMailServer and PeasyMailServer. To install you will need to run the file InstallPeasyMailServer. On Window use Explorer and select the file InstallPeasyMailServer.exe. Then right click on it with the mouse. This will bring up a list of actions. Choose "Run as administrator". On Linux just double click on it with the file system navigator or run it from the command line. Note that on some Linux systems the file InstallPeasyMailServer will lose its executable status when extracted. If this is the case then using the file system navigator display the permissions of this file. Enable property "Allow execute file as program" by clicking the check box. Alternative use the command line method "sudo chmod +x InstallPeasyMailServer". The installer will prompt you if you want to install this, just accept it. Then prompt if you want to install the Peasy Mail client. Accept this if you want to be able to configure the Mail Server from the same computer. Next it will prompt you to install the actual Mail Server, accept this.
If you want to install the Mail Server and Mail Client Client on separate computers then install it on each computer and just choose to install the desired application.
Run the Sartronics.com's Peasy Mail Client.
Administrator Account
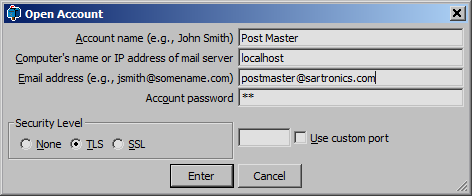
First set up an administrator account. Using menu Accounts > Open Account. Set the Account name to Post Master. If the Mail Client is running from the server computer then IP address of the mail server can be localhost, otherwise enter the actual IP address of the Mail Server computer. Next provide its email address and a password for the account.
Administrator Account Privileges
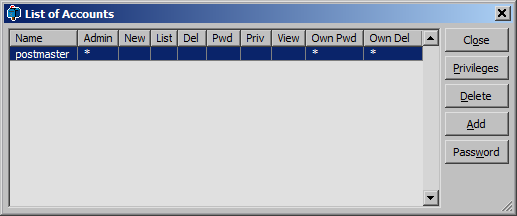
List the accounts on the server from the menu Server > Manage account. This will show the postmaster account. It will only have the default privileges. It is ideal to restrict the accounts holders that are permitted to change the Mail Server settings. If no account has any special privileges then all accounts will have full privileges.The Admin privilege give this account user full access to the Mail Server settings. It is equivalent to selecting the New, List, Del, Pwd, and View privileges individually.
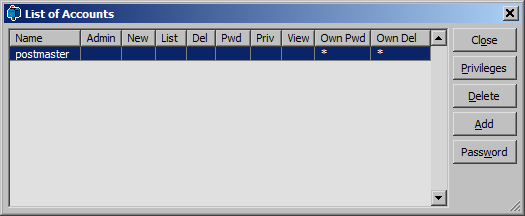
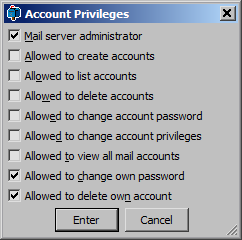
Choose the postmaster and press the Privileges button. The Account Privileges dialog will allow different privileged options to be chosen. Select the "Mail server administrator" option, and click on Enter.
The list of accounts will now be updated. Press close to continue.
Setting the Domain Name
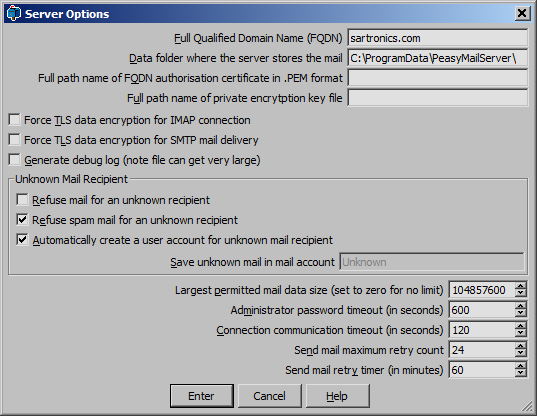
Using the menu Server > Server options enter your WWW domain name. This is refered to as the Fully Qualified Domain Name (FQDN). The image below shows sartronics.com, you will need to enter the name of your dot com or dot org domain name.
Creating a New Mail Account
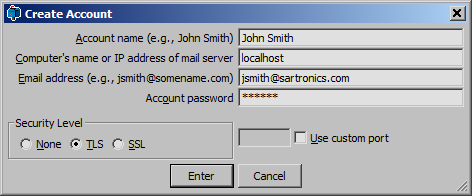
Use the menu Server > Create mail account. Enter a new mail account user. In the following example an account is created for John Smith with an email address of jsmith@sartronics.com.
Now the user John Smith can open the their mail account using their choice of email client, providing it supports IMAP communication. They may choose to use Sartronics.com's Peasy Mail as their client. If they do not have any Mail Server privilege then they can set the menu View > Options and tick the "Hide administration features" to hide the server menu items.
Starting and Stopping the Mail Server
Whenever the computer starts it will automatically start the Mail Server when it is starting the other services / daemon. From the Peasy Mail Client the Server can be stopped by using the menu Server > Stop Server. The Mail Server will restart the computer is restarted.